
Repotting is akin to providing your snake plant with a new lease on life.
It's an opportunity to refresh its environment, ensuring it continues to grow and thrive in your living space.
Repotting can often feel like a daunting task but with this guide, we'll simplify the process of repotting your snake plant.
We'll tackle the signs that indicate it's time to repot, the materials you'll need, and the steps to follow for a successful repotting experience.
Identifying the Right Time to Repot
As your snake plant grows and matures, repotting becomes necessary to provide sufficient space for its expanding root system.
The right time and technique for repotting are crucial for the plant's health and continued growth.
Generally, snake plants can be repotted every 3-5 years, but there are factors that can help identify when your plant is ready for a new pot.
Here are some key indicators:
1. Roots Outgrowing the Pot
If you notice that the roots are starting to peek out of the drainage holes or lift the plant out of the soil, it's time to repot.
2. Slow or Stunted Growth
Snake plants are known for their relatively slow growth, but if you notice little to no progress over several months, repotting may be necessary to provide more space and fresh soil for the plant.
3. Rootbound Plant
If you remove the plant from its container and see that the roots have densely circled around the soil, it's a sign that the plant is rootbound and needs a larger pot to thrive.
Best Time of the Year to Repot
It's important to note that repotting your snake plant can be done at any time of year, but it is typically best to do it during the late winter or early spring when the plant is entering its active growth phase.
This allows the plant to adjust to its new pot and soil before the upcoming growing season.
Materials You'll Need for Repotting
Here is a list of the things you will need to make your repotting task more manageable:
1. New Pot
Choose a pot that is 1-2 inches larger in diameter than the current one. Make sure it has drainage holes to prevent over-watering.
If you need more guidance in choosing pots, you can read here: What’s The Best Pot For A Snake Plant?
2. Potting Soil
A well-draining potting mix specifically designed for snake plants or succulents is the ideal choice.
It helps to maintain adequate moisture levels and promotes healthy root development.
Here's a quick guide: What’s The Best Soil For Snake Plants?
3. Gardening Gloves
Wearing gloves will protect your hands from soil and potential plant irritants.
4. Trowel or Small Shovel
These tools will assist in removing the snake plant from its current pot and transferring it to the new one.

View this Fiskar's Ergo trowel heavy duty gardening hand tool on Amazon.
5. Pruning Shears or Gardening Scissors
You may need to trim any dead or damaged roots during the repotting process.
6. Watering Can or Spray Bottle
Water your snake plant after repotting to help settle the soil and remove air pockets.
7. Plastic Sheet or Newspaper
Lay this down on your work surface to catch any loose soil and make the cleanup process easier.
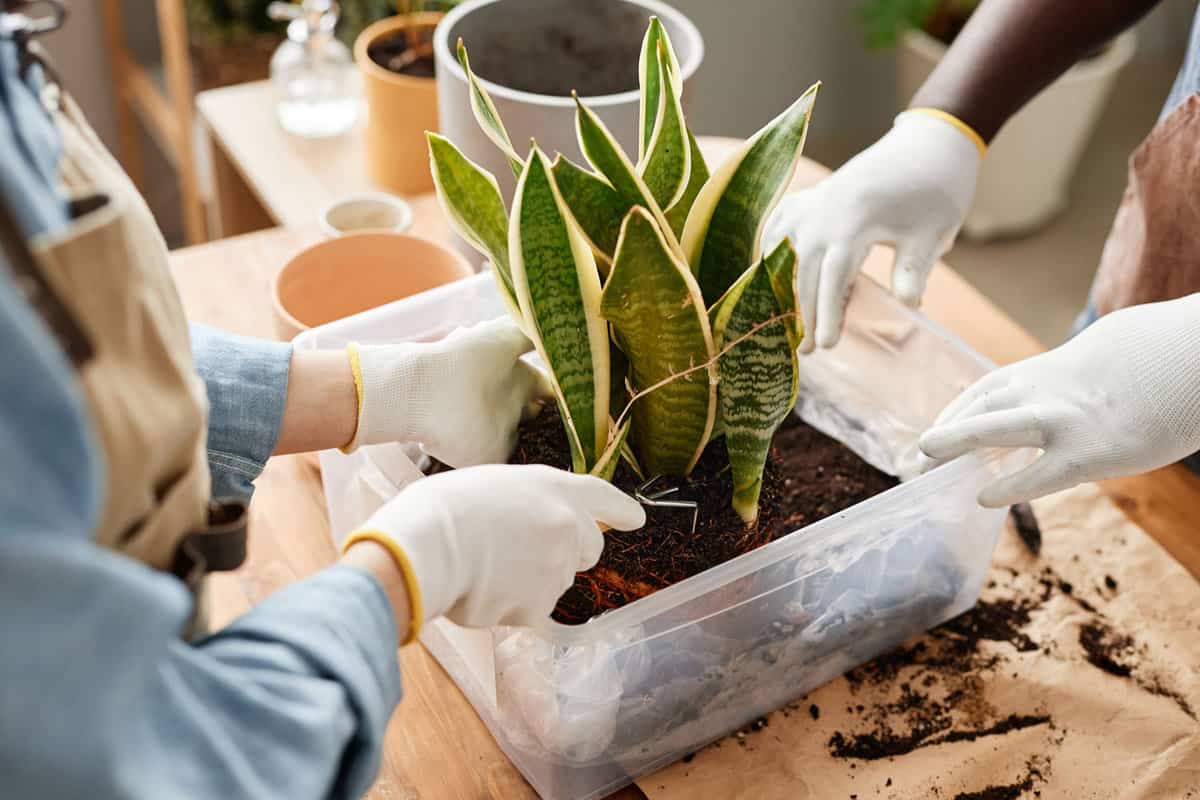
Repotting Procedure
Begin by preparing a clean workspace, putting on gloves, and gathering the necessary materials like a new pot, fresh potting soil, a watering can, and a trowel.
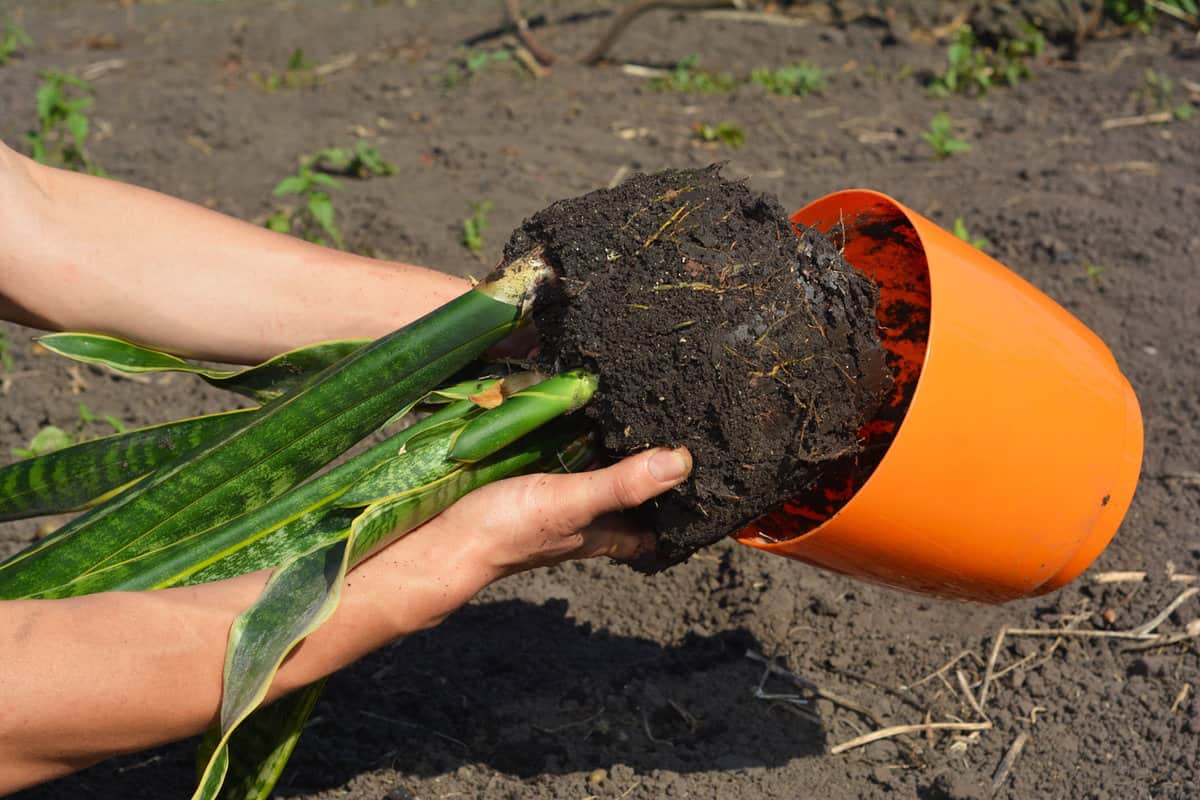
Step 1: Removing the Plant
Carefully remove the snake plant from its current pot. While holding the base of the plant, gently tap the bottom of the pot or massage the sides to release the soil and the root ball. Once the plant is out, place it on a clean surface.
Step 2: Examining the Roots
Look for any signs of root rot or pests. Trim away any unhealthy parts using clean pruning shears. Healthy roots should be firm and white.
Step 3: Dividing the Plant
Gently untangle the roots of the snake plant and separate it into smaller sections by either pulling it apart with your hands or using a sharp, clean knife.
Ensure each divided section has at least one healthy leaf, as well as a good amount of roots.
Step 4: Repotting
Fill the new pot with fresh potting soil, leaving enough room for the snake plant sections. Nestle the divided sections into the soil, spreading out the roots evenly.
Add more soil around the base of each section, pressing down gently but firmly to eliminate air pockets and provide support for the plant.
Step 5: Watering
Water the newly potted snake plant sections thoroughly, ensuring that the soil is evenly moist but not soggy.
Place the pot in a location with bright, indirect light and maintain proper care for your snake plant, including regular watering and occasional fertilizing.
Check out this video below for further guidance.
Post Repotting Care Tips
After successfully repotting your snake plant, it's essential to provide proper care to ensure its growth and prevent repotting stress.
Refrain from Overwatering
Firstly, be vigilant with watering. Snake plants prefer to stay on the drier side, so refrain from overwatering.
Allow the soil to dry out before giving it another drink. This may mean watering your plant every 2 to 3 weeks, depending on the humidity and temperature in your area.
If you're unsure, a good practice is to check the soil's moisture by sticking your finger an inch into the soil. If it feels dry, it's time to water your snake plant.
Here's your watering guide: How Often To Water Your Snake Plant
Indirect, Bright Light
Next, choose a suitable location for your snake plant. These plants can tolerate varying light conditions, but they do best in indirect, bright light.
Avoid placing them under direct sunlight, as it can cause their leaves to scorch.
Snake plants can also adapt to lower light conditions, making them an excellent choice for rooms with minimal natural light.
Provide a Comfortable Temperature
In addition, maintain a comfortable temperature for your plant. Snake plants thrive in temperatures ranging from 65°F to 80°F.
Avoid exposing them to cold drafts or extreme temperature fluctuations.
Ideally, keep them in a room with stable, moderate temperatures and provide proper humidity levels.
Finally, pay attention to your snake plant's appearance. Healthy snake plants have sturdy, upright leaves with vibrant green colors.
If you notice drooping leaves or browning at the leaf tips, it might indicate improper care.
Repotting Made Simple
Caring for a snake plant is quite simple, and repotting it is an essential aspect of its maintenance.
These low-maintenance plants can thrive in a variety of conditions, making them perfect for novice and experienced gardeners alike.
By following the proper steps for repotting, a snake plant can continue to flourish and enhance the beauty of any indoor space.
Happy gardening!
Snake plants are one of my favorite plants.
I have several !!