
Need to set up a vertical garden and not sure about how to water the plants? Should you water them manually or install a drip irrigation system? What are the pros and cons of each method and how do you go about implementing them?
Let me give you the short answers first - and then delve into the more intricate explanations.
Watering a vertical garden is as simple as using a long-spout watering can, if you have the time and inclination. If you can't commit to manual watering, you should set up a drip irrigation system. For an outdoor vertical garden, hook the system up to the main water source. For an indoor garden, use a reservoir-based system.
It really is as simple as that, so don't let watering concerns keep you from setting up a wonderful vertical garden - inside your home or in the backyard. Keep reading as we explain more about watering considerations for vertical gardens, including how to set up the right watering system for you and your garden.
Basic Considerations For Watering a Vertical Garden
Watering the plants in a vertical garden has some challenges that can be overcome with good planning and some strict attention. The many unique pluses of developing a vertical garden require basic watering tools and techniques in order to become fully operational.
This post will give a glimpse of the range of options for watering - from hand watering with useful tools to automated watering which depends on a clock for its periodic attention. Indoors and outdoor vertical gardens may require different methods but they can all be effective.
The Challenges of watering a vertical garden
The challenges of watering any garden include -
- Determining how much to water
- Setting up a regulated periodical watering system
Overwatering can ruin a plant as easily as underwatering.
The attempt at some sort of regulation of intervals is more of an exercise in discipline. Regularity between waterings is important to your plants’ overall well-being and also gives some assurance that it will get done.
Specifically, in a vertical garden -
Due to the smaller planting pockets and looser, less water-retentive soils which vertical garden planting requires, things can dry out quickly. Especially when the roots are not yet developed enough to seek out and store water.
Different locations in the yard or house also complicate things - a vertical garden in bright sunlight all day will use water at a far greater rate than one in the shade - or hanging on an indoor wall.
Indoor Vertical Gardens Vs Outdoor Ones
Sunlight affects the water needs of your vertical garden plants - both indoors and outdoors. When considering the watering needs of indoor plants, you should pay the same amount of attention to sunlight as you would with outdoor plants.
Indoor vertical gardens have their own unique complexities. The regulation of temperature indoors figures hugely in deciding on species and watering regimes. Naturally, outdoor plantings deal with the occasional randomness of weather factors. Indoors, the environment is far more controlled and regulated. Just the same, sunlight considerations do apply, even indoors.
Bright radiant sun beaming through a house window has the power to cause evaporation and heating of both the plants and the containers. Even partial sun differs dramatically from the full shade which is most often the case in indoor vertical garden walls.
Outdoors, of course, the weather is everything. Naturally, as mentioned, the Sun has enormous drying and heating power. In all cases, this affects how much and how often to water.
Manual Watering Regimes Vs. Automated Systems
For thousands of years, gardeners have had little problem understanding the labor of applying water to their plantings. But, just as work has changed so drastically, so has automation in applying water to plants.
There is much to be said for manual watering. Make no mistake, it is and always will be clearly the best way to grow and maintain vertical - or any - garden plants.
Manual watering allows you to check on plant health on an intimate basis. You will be paying strict and minute attention to potential bugs, the leaks caused by defects in containers, disease and fertilizer needs. Manual watering means you study and note all of these on a daily basis - addressing problems early on. Nipping them in the bud, so to speak. Also, the correct level of water is almost always maintained when you do things manually.
Can you do this - realistically?
Not everyone has the time. Fortunately, recent advances in automated watering systems make it possible to leave the garden alone for long periods. It makes vacations possible rather than being a slave to a garden or requiring favors from friends or family to maintain garden projects.
Modern technology now allows you to apply a designated, perfect and adjustable amount of water directly to the roots of plants. And time intervals are determined by preset waterings on a clock. This method has become wildly popular and is completely practical now for anyone. And, of course, it can still include close-up monitoring - that will never change.
How to Set Up a Vertical Garden Watering System
The first thing that needs to be addressed is the number of plants to be watered and the resources required.
Each plant has a measurable need and it is not that complex to find out what that watering requirement is.
Almost all plants have the same requirements at first, regardless of species. In fact, the only variations later involve how much foliage the plant produces which adjusts watering needs upwards.
Vines, for example, like watermelons, squashes and even grapes - or indoor plants such as Arturium or Orchids - have different needs from Succulents or drought-tolerant plants. It is important to understand that adjustments can be made at any time and quite easily at that.
Given the plant numbers and their eventual water needs, most cases will result in a basic system easily obtainable and implemented. If the original needs are for simple plans and not 100 or more plants, then the ‘auditing’ will consist of monitoring.
Manual Watering Products
Essentially, all you have to do is be able to apply water to the plants, on a daily basis. While this can be achieved pretty much with any watering can, with a vertical garden, you need to keep height in mind.
Depending on the size and height of your vertical garden, if you use a simple small watering can, it might be harder for you to reach the top rows of plants. You may need a chair to stand on, it the rows are high up. That’s not very safe.
What you could do instead is invest in long-spout watering aids.
If your vertical garden is outdoors and you’re using a hose for manual watering, this wand extension would be a great solution.

Click here to buy this Spraying wand extension on Amazon.
For indoor vertical gardens, consider a can with a longer spout, like this one.

Click here to buy this Plastic Watering Can Long Spout on Amazon.
Or even a sprayer like this one, with a long curving spout.

Click here to purchase this Sprayer on Amazon.
Drip Irrigation Systems and how to set one up
There are currently a wide variety of suppliers for Drip Irrigation systems. In climates where the drip is not commonly used in landscapes, relying on mail order online shopping will get the job done easily enough.
Typically, drip irrigation involves the following parts:
- A splitter
- Pressure Reducer
- Filter
- Water distribution pipes
- Water emitters
- A clock/timer
Don't worry about having to figure out where to get each part. Many companies sell whole kits like this one.

Click here to buy this Blank Distribution Tubing Irrigation on Amazon.
Once you have your parts, just go to the water source - usually a spigot from the house - and use a splitter to allow sharing hose usage as well the garden’s automated watering.
Typically, you first set up a pressure reducer and filter. Next, comes the “distribution” points along the pipes. At some point on the apparatus, a battery-powered clock/timer will be installed, probably right off the spigot. A black plastic pipe is inserted into an adaptor and the distribution tubing is directed to where your plants are.
The distribution tubing is completely flexible and can be fitted with leak-proof fittings to allow right angle turns. You should run the pipe up the vertical garden and then put in place an entire system of smaller connecting lines run to the plants.
At this point, “emitters” are installed, also easily pressure fit (no glue required). These are adjustable in delivery quantities and fit directly upon the soil of the plants. You can run a large number of these off one system and the height of the vertical garden doesn’t matter at all.
The system only begins dripping when the entire system is filled with water, guaranteeing the consistent and predictable amounts of water delivered.
The challenges of setting up drip irrigation indoors
Indoors automated watering tends to be more complex.
Because of appearance issues, you usually don’t want to run a hose along a carpeted or wood floor. While it is completely possible to utilize the same sorts of connections the outdoor vertical garden uses, it often requires additional carpentry or even boring through the floor to arrive at a permanent watering source.
The solution?
You’ll need to utilize more passive water sources - such as in-built reservoirs.
Some extremely practical vertical garden installations include a reservoir tank at the bottom. A small water pump then distributes and circulates the water once a day. You can get a system like this one.
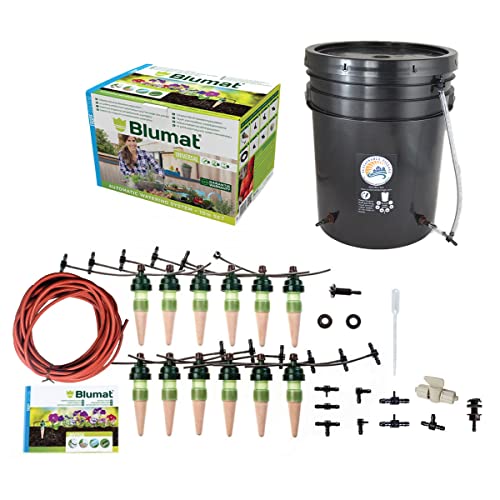
Click here purchase this Blumat Drip System on Amazon.
Interestingly, these systems often recycle unused water, by allowing them to overflow and drip down right back into the reservoir.
An additional water-saving tip
You can save even more water by using methods of water retention, such as wrapping young plants in the super-absorbable material. Of course, these would work well with manual watering, requiring longer intervals between waterings. There are root wrappings which conduct water so well that a half inch of water in the bottom of a tray could be sufficient to water a much higher plant.
Test Runs and Adjustments
Once you finish designing and installing your system, the first few waterings are literal test runs and will require inevitable adjustments. The better you get at predicting the rate of flow into plants, the better your results will be at the start for any future projects.
Watch for leaks, first.
Fittings which are not glued may stay put permanently, but they also require a firm insertion. Don’t give yourself a hard time over loose connections. It is entirely possible to misinterpret a solid connection - even the pros fail now and then.
Beginning at the water source itself, check the line thoroughly for leaks or potential leaks. This is actually a two step process.
1. Check the lines
After the first look, immediately upon first running the system, it can be possible for leakage to occur when at rest. Water tends to stay inside the pipes and will often leak from no pressure at all if the pressure connection is not just right. In other words, re-check the line at least once.
2. Check the emitters themselves
Secondly, check the emitters on or above the plants. Needless to say, over time vulnerabilities will become obvious, but checking immediately and watching emitter behavior can help you proactively fix iffy connections or faulty emitters. Inasmuch as it is a manufactured product, there is always a chance of a flaw somewhere.
Finally, check the amount of water delivered and the uniformity. This may require a more casual look as time goes by but it still matters enormously. Emitters can jam to varying degrees, the time might not be long enough for a good soaking or vice versa, may be too long, producing spillage.
Dealing with Typical Problems of watering a vertical garden
As mentioned already, test runs will reveal any immediate problems in a watering system. But you should be concerned with longer range issues as well. Problems can occur at just about any time. Let’s review some of the typical problems and how to solve them.
Bugs interference
Bugs can cause plugging of lines by nesting inside the lines themselves. There is actually a small device for emitters which fits over the ends called a Bug Plug. I highly recommend using these on outdoor installations where we have so little control over natural bug populations. They allow the water to perk through yet have a barrier for curious little bugs.
Dirt issues
Sometimes particles of dirt can foul a line by entering the emitter during what is called the “siphoning” phase. That’s when the relaxation of the pressure pushing the water out causes a sucking in of outside air.
With frequent watering, this dirt accumulates in the line and can form a complete blockage. Fortunately, as with most maintenance issues of these lines, the fix is easy.
Flush the line by removing the emitter and blowing out the offending collections. Then plug the emitter right back in. Other remedies can involve removing the cap installed at the end of the primary distribution line, ruin the system and do it that way, recapping when clear.
Kinks in the pipes
The distribution lines themselves can sometimes get deformed or kinked by foot traffic or inadvertent damage done while wrestling weeds or harvesting. “Unkinking” a line is usually quite simple but if changes were made somehow in the length of a line, it may be more of a challenge.
Changing water needs
Finally, one of the major adjustments to drip irrigation lines deals with the maturation of the plants themselves.
Some plants simply have different watering needs. Bear in mind as well, substantial root growth is bound to happen to perfectly-watered plants and those increase a plant’s overall thirst. Combine that with the size of the plants above the container level, you have the beginnings of an unequal balance between plants.
This can sometimes, but not always, mean either a change of watering time or else the changing of emitters to more gallonage. This is easy, actually, as is much of the watering lessons needed to have a thriving vertical garden.
A Note On Indoor Watering
As mentioned, it is possible to drip-irrigate indoor gardens from sources in kitchens or bathrooms - water sources within the house itself - but this can be problematic.
Not just for aesthetic reasons, but also for reasons which involve a question we have to ask with every installation, indoors or out. That question is this:
What happens when small disasters in the system occur?
Outdoors, this is not a huge issue. A busted line or blown emitter will cause a relatively small problem compared to indoors. Outdoors, we endure massive rainfalls and similar situations. But indoors is an entirely different issue.
This is why the reservoir is considered to be the better solution for indoor automatic watering systems. The reservoir system can even be designed to collect runoff or over-watering, all driven back down into the reservoir itself.
Needless to say, waterproofing will have already occurred in installations involving large wall vertical gardens, but the reservoir protects the floor.
You can install gorgeous designs to make the reservoir and the wall installation look terrific. Even just painted wood below working with the vertical structure can be attractive. The possibilities are endless and attractive, from copper facing to stonework.
Common Outdoor Watering Mistakes
- Always water before late afternoon or evening. Otherwise, water tends to stay on the leaves creating a fertile atmosphere for disease and fungi. Morning watering is always the best time to water.
- Using a sprinkler is out. There is absolutely no way of controlling the different amounts desired and it is another method of contributing to bacterial and fungal problems.
- Applications such as drip lines ease the water slowly into the destined soil patch. It is also the reason to use something besides a hose for watering because too much water splashing too hard can literally disturb roots and soil to their detriment.
- Misting plants is a definite no-no. As much as we love and want to tend to them, outdoor plants do not respond well to misting. It is a more than perfect way of developing bacterial and fungal problems.
Summary: Pros and Cons of Manual vs. Automated irrigation for your vertical garden
The original and most basic challenge for watering purposes in any vertical garden deals with a systems question: How do you choose between automatic or manual water applications?
Here's a quick overview of the pros and cons discussed in this post, along with some criteria which will help you decide whether or not installing an automated watering system would be a good investment.
| System Type | Pros | Cons |
| Manual Watering |
|
|
| Drip Irrigation |
|
|
Watering methods for vertical gardens outdoors allow us to harvest crops, seeds or flowers in small land and floor space footprints. Indoors, they supply a sensuous 3D experience of floral and foliage beauty in cleaner air and living beauty without pushing you out of the house.
Understanding the need for regular watering is pretty much a given for anyone who gardens. The diligence of the gardener is always the best method of growing gorgeous environments. Close inspection of plant health tells us much and hand watering allows us that perspective. Automated watering can add a dimension of freedom and still get the job of watering done. Nothing ever replaces the need for close inspection of any garden, but the addition of an automated system may be the closest thing yet to a guarantee that even a reluctant gardener can get the most out of any vertical garden.