
![Timber Garden Edging [Ideas, Tips and Pictures]](https://gardentabs.com/wp-content/uploads/2019/09/Timber-Garden-Edging-Ideas-Tips-and-Pictures.jpg) Your garden is gorgeous, and it's finally complete. It just needs one finishing touch: edging. When deciding what material to use for edging, timber is a great option. It adds a natural finish to your garden and is more attractive than metal options. It also stands up to weather and other environmental elements better than plastic edging and is cheaper than stone edging materials.
Your garden is gorgeous, and it's finally complete. It just needs one finishing touch: edging. When deciding what material to use for edging, timber is a great option. It adds a natural finish to your garden and is more attractive than metal options. It also stands up to weather and other environmental elements better than plastic edging and is cheaper than stone edging materials.
When using landscaping timber, you have a variety of options available. There are several different kinds of wood you can use, as well as different thicknesses and lengths of timber. You can easily stack the wood to create a wall from the timber you've chosen, or lay single logs end to end to create a simpler edging style.
We've researched and compiled plenty of information for you about timber garden edging. Keep reading to find out everything you need to know about this awesome landscaping look!
Types of Timber for Garden Edging
While there are many different types of wood in the world, only a few are good for landscaping with. You can get these woods in either treated or untreated versions. The treated versions will hold up better in the elements but have been treated with oil-based preservatives. If you want an organic garden, check the chemicals used on the treated timber before purchasing.
Cedar
Cedar is a gorgeous red-colored wood that's a good choice for landscaping. While it's more expensive than synthetic material, it's a rather affordable wood. This wood doesn't absorb moisture easily, making it resistant to warping.
This wood does need consistent upkeep, however. In order to keep the warm red color of the wood, it needs to be cleaned and sealed every year or two. Even with this precautionary care, eventually the color will fade and the wood will gain a greyish white color tone.
Cypress
This naturally rot-resistant wood is a great choice for garden edging. In the Southeastern parts of the US, it's a good alternative to cedar price-wise, but in other parts of the country, it can quickly become a rather pricy option.
Cypress is a very durable wood, however, the durability is directly related to the age of that particular tree. Younger cypress wood is less durable, and also cheaper, while older cypress wood is more durable and more expensive.
Redwood
Redwood is a good choice for outdoor use as it's resistant to bugs and rot as well as moisture. Using it for your garden's edge will ensure you've got a great edging for many years. It holds stains well and will keep its color longer.
This wood's natural resistance to moisture keeps it from warping, a great feature for timber used for garden edging. This wood is a good deal more expensive, however. There isn't much of the older redwood left in the world, and the further you travel from the west coast of the US the more expensive redwood will be.
Pros and Cons of Using Timber Edging
When choosing an edging material for your garden, there are many different aspects you need to consider. Durability, maintenance, and ease of installation are definite considerations, as well as the look of it. Here are a few pros and cons to help you make your landscape decision easier.
Pros:
- Versatile: Landscape timber is incredibly easy to customize. You can use one type of wood or many, lay it in a single layer or stack it, use logs or flat slices of wood, etc.
- Sturdy: Timber won't dry and crack in the sun like plastic, and the hardwoods used in landscaping aren't prone to warping or splitting, making them a solid choice.
- Easy to work with: Unlike stone, you can easily cut timbers to the exact lengths you need without the use of special tools. You can also have logs cut previously to being delivered, saving you the work.
- Non-toxic: The lack of chemicals used in most landscape timbers is an excellent feature for green gardeners. However, it can still be a concern with some treated wood, so be mindful when purchasing if this is a concern for you.
Cons:
- Rot and insect susceptible woods: The woods we've mentioned here are resistant to insects and rot concerns. However, more than these few types are sold as landscape timbers. It's important to know before purchasing if the wood you've chosen is able to resist either or both of these issues.
- Expensive: Depending on your location, it can become quite expensive to use woods in your landscaping. Consider when purchasing if there may be a wood native to your area that would work rather than a wood that would have to be shipped in from a good distance.
How Much Does Timber Edging Cost?
There are a lot of factors that influence the final cost of your landscape timbers. However, we've found a few general numbers:
- Treated wood typically runs around $400/50 feet
- Untreated wood typically runs around $300/50 feet
However, depending on the type of wood and the design for your edging, costs can rise dramatically. Delivery fees, especially for woods that aren't locally grown, can be substantial. If you choose to hire a landscaping crew to build your edging it will add to the final cost. If the landscaping crew has to manipulate your yard to address drainage issues or level the ground, costs will rise according to the amount of work they need to do.
How Do You Install Timber Edging?
Installing landscape timbers can be tricky, but once you learn it you can construct a simple edging yourself without having to resort to hiring professionals.
1. Mark Your Edging Design: The very first thing you need to do is mark out where your edging needs to go. Use a rubber mallet to drive a stake into the ground where you want your edging to start. Tie a rope to the stake and stretch it along the path you want your timber. When you get to a turn in your edging, drive another stake into the ground. Do this until the entire area has been marked by the rope.
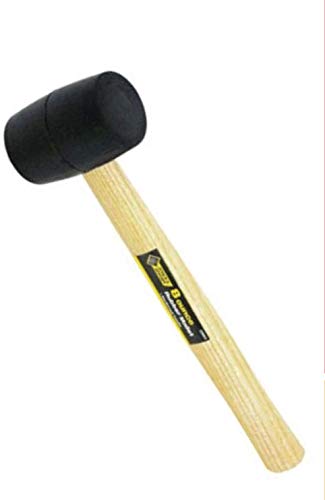
To find this rubber mallet on Amazon, click here.

To find these ground stakes on Amazon, click here.

To find this rope on Amazon, click here.
2. Dig up the Grass: Use a flat spade to cut the grass or other plants in the edging path away from the ground. After you cut all the plants, come back with a shovel to remove them from the path you've marked.
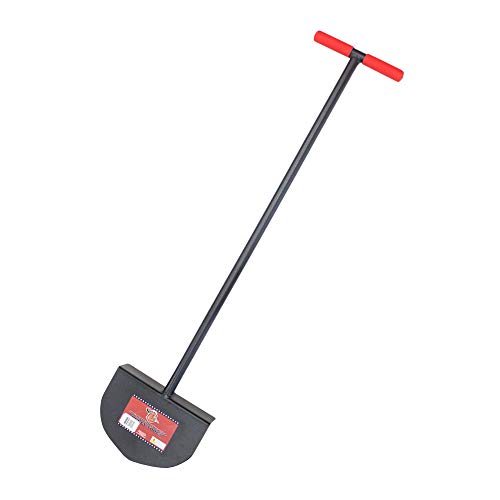
To find this flat spade on Amazon, click here.

To find this shovel on Amazon, click here.
3. Level the Ground: Your timbers need a flat place to rest or they're likely to roll away from your intended edge. To prevent this, you need to get the ground level. Start by using a pick or shovel to dig out rocks and roots that are in your planned path. After you've removed these, fill dirt into the holes they left with your shovel.
Once the holes have been filled in you need to walk over the exposed dirt for your edging to pack it down. You may need to add more dirt to the areas you removed rocks or roots from once you've done this step. If so, walk the path again to pack in the new dirt.
After you've walked it a few times, check to see if the ground is level. Use a carpenter's level or a straight board for this step. Your ground doesn't have to be perfectly level, but it must be mostly flat.
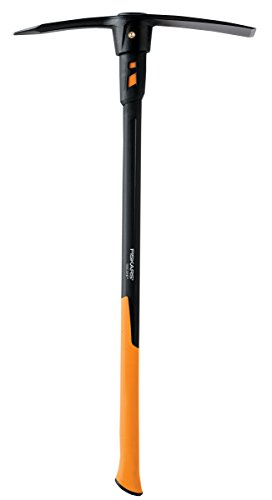
To find this pick on Amazon, click here.

To find this carpenter's level on Amazon, click here.
4. Lay Out the Timbers: Lay the timbers along the path you've made. Make sure your timbers are the correct length and that each piece is flush against the next.
5. Connect the Timbers: Once the timbers are correctly laid out, it's time to connect them. This, like leveling, helps ensure that the logs won't roll. Use a metal plate and deck screws to connect each timber to its neighbors. If you have exact 90-degree angles, you can connect at turns using corner braces and deck screws.
If you have more complex turns, however, you will have to cut the timbers in the correct angle to ensure a good fit. Once you have the corners lined up right, you simply use the corner brackets to connect them.
Wondering where to put these tools? These outdoor storage solutions might help you!
Installation Video
If you're more of a visual learner, check out this video walking you through the steps of installing timber garden edging!
Photo Examples of Timber Edging
As you can see from this photo, laying timbers flat and end-to-end is not the only way to install this type of edging. Shorter pieces of timber can be installed in a vertical fashion to create this type of fenced edging.
This timber edging doubles as a retaining wall, allowing for a raised garden. You'll notice the wide top plank of wood also makes a sort of bench, a nice idea for encouraging you and visitors to rest and enjoy the garden.
This garden edging is simple in design, showing that you don't need a complex look for a great garden. You'll notice, too, that there are added supports in the form of short, sturdy pieces as well as a trench to help keep the planks in place.
This edging uses logs stacked on top of each other to create a retainer for the bed. Rebar is likely used to help keep the logs in place as well as metal brackets.
This garden is still under construction, but they started with the edging and made a raised bed. This thick, wide edging will hold the garden bed in place so it doesn't shift and damage the plants.
This is another simple look, but simple is sometimes better! This timber edging adds to the rustic look of this garden that's already present in the plants and the stones in the bed.
This image shows a beautifully stained timber edging that has multiple uses. The edging holds back the garden but has a double layer with rocks sandwiched in that, in turn, contains sprinklers to water the plants with. Style and functionality at its finest!
This timber edging is used a bit differently as it marks out a walkway through the garden rather than marking the garden itself. This is a creative way to use timber edging in a garden without actually marking the outline of a bed.
This use of timber edging is perfect for not only edging a garden but creating one where there wasn't ground for one before. This is a great way to use timber edging on a small patio or balcony for an apartment.
The owner of this yard used timber edging in another unique way. Not only does the timber outline garden beds, but it also pulls double duty to outline walkways between beds and separates the entire garden from the yard.
The edging used here is similar to the first example we showed you. Instead of using rounded logs, however, the owner used squared logs to create a unique look.
The two layers of edging used in this image create a double edging. Not only was timber used to outline the garden, but the owner added mulch to create both design and an added layer of protection for the plants.
A double layer of rounded logs makes for a simple yet beautiful edging. The wood in this picture has been stained and sealed to ensure a gorgeous color in the edging.
Triple stacked wood makes this edging double as a retainer for this raised garden. The section on the grass showcases the added support given to the walls of this edging.
Timber Edging
As you can see, the simplicity of timber edging makes for a beautiful and versatile garden edging option. Use any of the examples above as the inspiration for your own garden and you're sure to have a showstopping yard in no time!
Know more about garden edging! Here's a post about Types of Edging for gardens.
It’s good to know that cedar doesn’t absorb moisture easily because that means I can use it in my rainy climate. It rains quite a lot here, so I was worried about putting any wood in. But I bet if I got cedar wood that has been treated then I’ll be good to go.
I just moved into a house that has a lawn last Monday. I want to try to improve its landscaping by doing some edging. Thanks for explaining that it would be smart to use a rubber mallet to help put some stakes in the ground to start the process. It might be easier for me to hire an expert to do the edging for me since. Then I wouldn’t have to buy any tools.
This blog discuss about all the best things on the timber garden edging in detail. I loved this article very much. Such articles are not only knowledge enhancers but also very interesting to read and to compare from.
Thanks to the author for sharing such a great post. The article was very well written and providing great info about timber garden edging!! It can be really great for people like me who are looking to get such kind of more knowledge about it.
Thanks a lot to you for sharing about the timber garden edging are discussed over here, these kinds of ideas are much needed. I really appreciate that you have provided the data too, really appreciative and useful blog for us. Looking for more!!
This is really appreciated that you have presented all data on the timber gardening edging. I love all the information shared. I like how you have researched and presented these exact points so clearly. Great article!
It’s a great source of knowledge; I think it will be helpful for lot of people who are looking for timber garden edging . Thank you very much for sharing this article, this is really helpful for me, thanks again and looking for more in future!
Blog discusses about the timber garden edging. This article provides us true and insightful information regarding it. This article is very helpful. Great blog indeed, will visit again future to read more!!I am sure many people will come to read about it in future.
I loved your blog and thanks for publishing this about timber garden edging!! I am really happy to come across this exceptionally well written content. Thanks for sharing and look for more in future!! Keep doing this inspirational work and share with us.
Wonderful information, thanks a lot for sharing kind of content with us. Your blog gives the best and the most interesting information on timber garden edging. I wonder if we can gather such practical information about it, a great post definitely to come across.